This chauffeur is variation 4, assistance OS:
- Windows XP Specialist SP3 House Edition (32bit).
- Windows Vista Company/ Ultimate/ Business SP1 House Edition (32bit).
- Windows XP Embedded SP2.
Assistance Designs List: TM-H5000II, TM-H6000II, TM-H6000III, TM-J7000/ J7100, TM-J7500/ J7600, TM-C100, TM-T70, TM-T88III, TM-T88IV, TM-T90, TM-P60, TM-P60, TM-L60II, TM-L90, TM-L90 Peeler, TM-U120, TM-U220A, TM-U220B, TM-U220D, TM-U230, TM-U375, TM-U675, TM-U950, TM-U295, TM-U590, DM-D110, DM-D120, DM-D210, DM-D500, EU-T300, EU-T400, EU-T500, BA-T500.
Setup:.
1. Double click the [APD] icon and begin the setup.2. The Install ShieldWizard screen appears. Click the [Next] button.
3. The "License Contract" screen appears. Check out the material and choose "I accept the regards to the license contract". Then click the [Next] button.
Also read: 3d Printer Filament Recycler4. The "Setup Type" screen appears. Select "Requirement", then click the [Next] button.
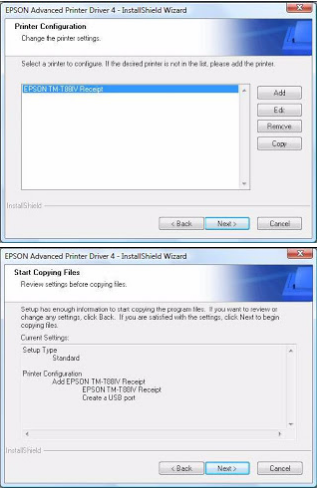
5. The "Printer Setup" screen appears. When setting up the printer motorist in addition to the APD, click the [Include] button. When you wish to set up the printer chauffeur later on, click the [Next] button and continue to Step 11.

6. The "Include Printer" screen appears. Set up the printer chauffeur and port to utilize, and click the [Next] button.
Also read: How Much Does A 3d Printer Cost7. The "Parallel Port Settings" screen appears. Set up the settings of the Parallel port and click the [Next] button. Continue to Step 10.

8. The "Serial Port Settings" screen appears. Set up the settings of the Serial port and click the [Next] button. Continue to Step 10.

9. The "Ethernet Settings" screen appears. Set up the IP Address of the TM printer and click the [Next] button. Continue to Step 10.

10. The screen go back to the "Printer Setup" screen. All the printer motorists, set up in between Action 6 to Step 9, appear in the list. To set up numerous printer chauffeurs, repeat Action 5 to Step 9. To set up the exact same printer motorist several times, click the [Copy] button.
For the following setup mixes, choose the setting of the very first printer motorist for the "Port Type" of the "Include Printer" screen at Action 6 when you set up the 2nd or later printer motorists (example: "Show EPSON TM-H6000III Invoice"). - Utilizing both the Invoice motorist and Slip chauffeur for a hybrid printer. - Utilizing peeler paper on one label printer and utilizing full-label paper on another label printer. - Making numerous various print settings on numerous printer motorists (Example: utilizing 2 motorists, define picture invoice printing on one motorist and define landscape invoice printing on another chauffeur).

When the settings of the printer motorists are ended up, click the [Next] button.
11. The "Start Copying Files" screen appears. See "Present Settings" to verify the setup settings then click the [Next] button.
12. The "InstallShield Wizard Total" screen appears. Click the [End up] button to complete setup. Advanced Printer Setup .